Wednesday, July 30, 2008

Droor Flama


The floor finishers came back today and sanded the floor back down to the bare wood again and started over - this is the 3rd round. They are using a different brand stain and a sealer so all we can do is cross our fingers. The new stain isn't as dark as the first stain which is disappointing especially considering that I wasn't sure the first color was dark enough. And it has a lot of red in it that I really don't like. But if it isn't spotted, I can live with it...I guess. This is a pic of the sanding in progress - you can see the prior color along the edges.

Tuesday, July 29, 2008

One Person's Trash...


This is a great chair...no, really! My friend, Sylvia, found it on the side of the road waiting for the trash man and knew it would be perfect in my new kitchen. It is a counter-height stool so it is the correct height for my island. I took it apart, lightly sanded, stained the exposed wood and coated with polyurethane. I also recovered the cushion - obviously. I have a few more coats of poly to go before I can put back together and repost a pic. Now I just have to find a "matching" chair. Sylvia, hit the dumpsters!

Monday, July 28, 2008

Polka Dotted Floor?


Well, here is what the kitchen floor looks like. See the spots? They appeared in the last coat of polyurethane. The flooring finishers came back and added another coat of poly in an attempt to cover the spots but it didn't work. So they came back and added another coat. The top coat was satin so after 3 coats of satin, the floor just looked dull and the spots were still visible (though not as bad as before the additional two coats). Next the finishers came back and sanded the floor back down to bare wood and started over. The stain worked out fine but the first coat of poly....we're seeing spots again. The last couple of weeks have been very frustrating - we've waited so long to have a functioning kitchen and now we can't go in there while the floor is being finished (and refinished). And to make matters worse, I have to leave the house during the day after they apply the finish to try to keep the dust down and because the fumes are overwhelming. Let's count the number of times I've had to leave the house: 1)first coat of stain 2)2nd coat of poly 3)third coat of poly 4)4th coat of poly 5)fifth coat of poly. Resand and start over 6) first coat of stain 7)1st coat of poly 8) 2nd coat of poly. The eighth time was today. The flooring contractor came out of the kitchen shaking his head--that can't be good. More spots and he doesn't have a clue why. The only thing he knows for sure is that he will have to sand down to bare wood...AGAIN...and start over...AGAIN. Great.

Team 6 Training Schedule


Boxcar Sally sittin’ on the porch waiting for Team 6

Team 6 Training Schedule

28 July 2008
Monday
3 Rounds for time
400 meter run
Pull-ups
Squat Thrust (Burpee without the push-up or jump and clap)
Pull-ups and Squat Thrust will descend in reps per round i.e. 21, 15, 9

29 July 2008
Tuesday
Skill Training
Kipping Pull-ups
If you can’t do 40 Kipping Pull-ups then you need to work on them. It’s a skill that requires strength, speed, coordination, flexibility, and just about everything else that describes athletes. On this day you will learn the kipping pattern and all kinds of tricks and tips to become a kipping fool.
Skills training will be followed by some core training.
Rockers, med-ball throws and some other funky stuff.

30 July 208
Wednesday
Warm-up will be Deadlift to your max.
WOD
For 20 minutes perform as many rounds as possible with the following couplet:
Deadlift X 7 reps (weight will be 70 pounds minus your max)
Row 250 meters

31 July 2008
Thursday
Skill and Strength day
Front Squat 5 sets of 5 reps with as much weight as possible.
Run 5K (For those of you closer to your dirt nap than your birth, it may be helpful on your knees and ankles to stop and walk for a minute every 5 to 10 minutes. I have been doing this for years and it has seriously reduced joint pain. Also, once the run is complete do 25 air squats to maintain your squat flexibility. The first few will be painful, but by rep 10 you should be gaining back the mobility you lost from your hamstrings tightening up from the run.)

01 August 2008
WODProgramming will be in the hands of amateurs - everyone who shows up will get to choose a movement and a WOD will be developed from those movements.

Sunday, July 27, 2008

Stripping


I walked upstairs tonight --can't remember why -- and next thing you know, I'm removing the wallpaper in the bathroom. Didn't plan it - just couldn't take it anymore. The best way I've found to remove wallpaper (I've tried all the gadgets and solutions) is to rip off the top layer to expose the bottom "paper" layer. Once that is exposed, wet the wall down with plain ol' water, wait a few minutes so the water can soak thru and loosen the glue, and then it will just come right off. The old wallpaper was so bad that Michael commented on how much better the wall looked even with the paper backing still hanging on the wall. Who picks out this stuff?

Saturday, July 26, 2008

Burn Baby Burn


I think it's projects like that makes Michael spends so much time away from home. The hedges between our house and the neighbor's were infested with aphids. I sprayed them with the mean stuff but there were just so many of them that it really didn't make much difference. The aphids had migrated to my new shrubs and it was a losing battle to keep them out of the new ones when we had an aphid farm 20 feet away. Then my neighbor informed me that the prior resident was constantly spraying the hedge trying to get rid of the aphids but never could get them under control. That settles it. The hedge must come down. There were fifteen separate bushes at approximately 10 foot tall. We cut them down and burned all of them. Michael sure knows how to get a fire burning hot enough to burn green wood down to ashes in a short time. Now, what are you gonna do about the stumps?

Sunday, July 20, 2008

East Coast CrossFit Team 6


This post is for folks interested in following East Coast CF Team 6 workout for the week of 21-25 July.

Monday
21 July 08
WOD
Chelsea
5 pull-ups
10 push-ups
15 squats
For 30 minutes every minute complete the sequence. Special rules: chest must touch pull-up bar for pull-ups, chest must touch ground for push-ups, butt must touch medicine ball for squats. Modify reps as necessary i.e. 3 pull-ups, 8 push-ups, and 13 squats or if you're froggy 7 pull-ups, 12 push-ups, and 17 squats.

Tuesday
22 July 08
Deadlift find your max
Row 2000 meters for time.

Wednesday
23 July 08
Burpin’ Helen
400 meter run
21 Burpees
12 Pull-ups

Thursday
Snatch skill development and find your max

Friday
Programming will be in the hands of amateurs - everyone who shows up will get to choose a movement and a WOD will be developed from those movements.


Monday, July 14, 2008

Is it Dark Enough?

I attempted to sand the pine flooring but it just didn't work out. We rented one of those orbital sanders from Home Depot and ran into several issues: 1) It was hard to control - easy for Michael but hard for me 2)It was slow going 3)I wasn't happy with the results because it left small "curly-cue" marks in the wood from the sander. I could get the marks out with my hand sander but that is a lot of work. 4) The final issue was that my pine flooring clogged up the sandpaper so frequently that I had to go back to HD after only sanding less than 1/4 of the floor to get more paper --when I rented the sander, they sent me home with "more than enough" to finish the job. Of course when I got there they were out of paper so I just went back home, loaded up the sander and returned it with the job unfinished. After thinking about it, I decided by the time I pay for all the sandpaper it is going to take and the amount of time involved and the fact I really wasn't happy with the result, I would be better off to just pay someone to sand it. Michael agreed but took it one step further and suggested we just get someone to finish it, too. The one thing that was an 'afterthought' in the kitchen turned out to be the biggest undertaking.


So the finishers showed up today, sanded the floor and stained it. It is not as dark I we had hoped but I'm not sure we can get it any darker. The finishers said they will add a second coat of stain tomorrow but after looking at it, I'm just not sure it will work. A lot of the red still shows but it definitely looks better than the old flooring. I heard a lot of comments from them about their sandpaper getting clogged rather often.
Here is a comparison to the old flooring (tip: the old flooring is the one running vertical that has the large gaps between each plank):
And the darker stain really brings out the grain patterns and sets off the white cabinets.

Saturday, July 12, 2008

Who Do You Support?


Ever wondered what happens to those campaign signs you see around? Yeah, me neither. But now I know. The very nice old man that lives here is obviously a dedicated supporter of Bob Etheridge. He has one of these large wooden signs displayed in the bed of his pickup and drives around doing errands and such with it there. It appears he is also the keeper of the huge wooden signs as they periodically appear in his yard for several days at a time and then disappear again. Who knows where they go. At one time, I knew this guys name but now I and the neighbors usually just refer to him as "Bob".

Friday, July 11, 2008

Time to Move the Burn Pile


I'm pretty excited about the sink area. The plumbers made it back today and installed the sink in the "now big enough" cutout in the countertop. One thing I insisted upon from the beginning of the project was that the windows be low enough so the countertop could flow into the window allowing for more countertop space behind the sink and, I think, a more streamlined look. I argued about this when the windows were ordered and again when the framers put in the windows --they all thought I was nuts. Well, I'm glad I stuck to my guns because I love the look. The cabinet that holds the sink is extended forward 2 inches from the adjacent cabinets allowing for a large work area. Yes I know, I still have to install the trim around the window...all in good time. And we probably need to move the burn pile so it's not the focal point of the view from the kitchen window.

Thursday, July 10, 2008

Now We're Cooking...Almost!


The cooktop is almost functional. The electrician wired the downdraft fan and the HVAC guys added the vent for the downdraft. Now I just need someone to run the gas line (he's supposed to be here Friday!).
The double ovens work great! Purchased the Jenn-Air ovens for a steal at the Habitat ReStore (that is also where I purchased new limestone tile for my 1/2 bath @ .75 sq ft - you gotta check out your local store). Now I just need to get the doors on the cabinets...maybe a little paint on the walls...

Wednesday, July 9, 2008

Another Use for Michael's Weights


Today I routed the edges of the countertop, sanded both the top and the edges, and applied the sealer/finish. The edges had to be sanded by hand and it ruined my hands. This stuff is extremely hard (yes, I know I mentioned it before but thought it should be reiterated) and is not like working with wood. Sanding a wood edge would be a breeze - this was not. It took HOURS to sand the edges but the end result is really nice - they are as smooth as glass. I still have to build up the edges (to make the 3/4" thickness appear to be 1-1/2 inch) but will have to wait until my hands recover. The instructions said to attach the countertop to the cabinet using mechanical fasteners, such as wood screws, and silicone. Well, the wood screws didn't work out so well. I only tried one. This stuff is so hard that drilling the pilot hole was almost impossible and when I tried to insert a screw, the head twisted right off. We decided to use silicone only and use these weights and a few clamps to hold it down until the silicone dried. I'd like to see someone get screws in this stuff.

Tuesday, July 8, 2008

Oops! The Sink Won't Fit

The plumbers came out today to install the sink, dishwasher and washer drain. All was well until they attempted to drop in the sink - the cutout wasn't quite large enough. I tried using a belt sander - not so sure that was a good idea...dusty, dusty, dusty- to knock a little off but it didn't work. After the second attempt didn't work, the plumbers decided to come back another day to give me time to make sure the hole was large enough before they had to hoist the sink again - did I mention the sink is cast iron and heavy, heavy, heavy? This time I'm sure it fits. But just to avoid any problems, I also beveled the edge to make sure the brackets wouldn't get in the way. Now it fits perfectly. No, the bottom of the cabinet is not black. That is countertop dust - what a mess.

Sunday, July 6, 2008

Coal Miner's Daughter


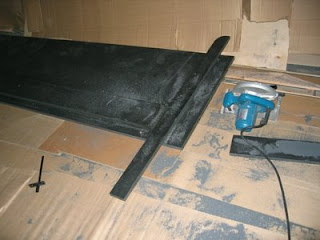
This countertop material, Paperstone http://www.paperstoneproducts.com/- made from recycled paper and resin, is extremely difficult to cut. It was delivered to my house via 18-wheeler in one solid sheet measuring 12'x5'. The instructions said it can be cut using woodworking tools so I thought I would give it a try. I think I should clarify a few things for anyone that attempts to cut this stuff - it is NOT like cutting wood. You will need powerful woodworking tools to cut it. Don't expect to pick up a Ryobi anything from HD and have it last long enough to finish the job. My tools were definitely being pushed to perform and my blades dulled quickly. The actual cutting was an extremely slow process taking the entire day with lots of rest breaks for my hands. Secondly, this stuff makes a huge mess. A week later, I am still dusting the fine black powder from the kitchen and I have yet to muster up the motivation to tackle the mess in the shop. And by the time I was finished, I was covered with this stuff - Michael now refers to me as the Coal Miner's Daughter and Sandra said she liked my mustache!

Saturday, July 5, 2008

Where are the Real Studs?


The actual cabinets were installed today. And it took ALL day. Yes, we are rookies. First we attached the face frames to the cabinets (they weren't previously attached because the face frames have bracket feet and I didn't want to risk the feet getting knocked off), then set the cabinets on the pedestals and attached the cabinets to the wall studs and the pedestals with screws. Simple, right? Again, it took ALL day. Just finding the studs was a problem. This stud finder that usually works great, apparently can't find the studs through the back of the cabinet that is also wood so it became useless most of the time. We also tried measuring in 16 inch increments from one confirmed stud (assuming they were 16 inches apart) but that didn't work either. In the end, we used the "tried and true" method of me knocking along the wall until I "heard" the stud. Worked like a champ! Michael did find that this little contraption has another use - as a real life stud finder. It alerts when pointed at him. Yes Babe, you're a stud!

Thursday, July 3, 2008

A Level That's Not Level?


Today was the day to install the pedestals that all of the base cabinets will be set upon. I decided to use separate pedestals rather than ones integrated into the cabinet to make the process of leveling easier. That was a wise decision. The area of the floor where the cooktop cabinet is located had a slope of about 1 inch over a five foot span --with a small "hump" in the middle. And just to make it even more entertaining, the new wall bowed out at about the same rate. It took a lot of shims and a lot of cursing (required) to get things level. Somewhere along the way, we figured out that the 2-foot level we were using showed a different reading depending on which side of the level was sitting against the surface we were trying to level. That helped clear up a lot of confusion for us as to why it was level one minute and then not level when we did, yet another, "final" check. By the way, it was a Stanley 2-footer...beware of the cheap levels.

Tuesday, July 1, 2008

Mole Hunter


Believe it or not, he actually catches the moles. We had an awful problem with moles in Washington until Pete showed up. There was one instance where a mole was destroying my planting beds and since Pete knows to stay out of those, the mole escaped his hunting prowess. I had to call in a professional trapper. The guy came out and set up numerous traps. A week later, the mole made the mistake of venturing outside the beds and into the yard. Big mistake - Pete got him (and I praised him repeatedly). The trapper came back and retrieved his empty traps. The moles aren't as bad here and I expect Pete will take care of this one soon. Just hope he doesn't start hunting in the neighbors' yards. They may not see it as I do - the little bit of digging in the grass Pete does is minor (and restricted to one area) compared to the amount of damage a mole will do over time to the entire lawn. Go Pete!